Äîêóìåíòàöèÿ è îïèñàíèÿ www.docs.chipfind.ru
General Description
The MAX1165 evaluation kit (EV kit) is an assembled
and tested circuit board that demonstrates the
MAX1165 analog-to-digital converter. The EV kit can
also evaluate the MAX1065/MAX1066 and MAX1165/
MAX1166. Request free samples of the desired parts
when ordering the MAX1165 EV kit.
Features
o Proven PC Board Layout
o Convenient On-Board Test Points
o Fully Assembled and Tested
Quick Start
Recommended Equipment
·
MAX1165 EV kit
·
Two DC power supplies, 5V at 10mA
·
Programmable signal generator, such as Tektronix
DG2020A
·
Logic analyzer (optional)
·
Reconstruction DAC (optional)
Procedure
The MAX1165 EV kit is fully assembled and tested.
Follow these steps to verify board operation. Do not turn
on the power supply until all connections are com-
pleted.
1) Ensure that JU1, JU2, and JU3 are open (see
Table 1).
2) With the power off, connect the first 5VDC power
supply between AVDD and AGND.
3) With the power off, connect the second 5VDC power
supply between DVDD and DGND. Note: DGND
and AGND are connected on the MAX1165 EV kit
board. To avoid ground loops, do not connect
AGND to DGND at any other location.
4) Configure the pattern generator to produce the
appropriate read/convert (R/C) and conversion start
(CS) waveforms. Refer to Figure 2 in the MAX1165
data sheet.
5) Connect the pattern generator CS output across
jumper JU4.
6) Connect the pattern generator R/C output across
jumper JU5.
7) Connect logic analyzer or other digital data capture
system to header H1. The least significant bit, D0,
appears on H1 pin 1, and the end-of-conversion out-
put strobe (EOC) appears across jumper JU6 (see
Table 2).
8) Turn on the power supplies and enable the pattern
generator.
9) Apply 0 to 4.096V analog input signal between
pads AIN and AGND. Capture digital data from
header H1.
Evaluates: MAX1165/MAX1166/MAX1065/MAX1066
MAX1165 Evaluation Kit
________________________________________________________________ Maxim Integrated Products
1
19-2558; Rev 0; 6/02
Component List
For pricing, delivery, and ordering information, please contact Maxim/Dallas Direct! at
1-888-629-4642, or visit Maxim's website at www.maxim-ic.com.
Ordering Information
PART
TEMP RANGE
IC PACKAGE
MAX1165EVKIT
0°C to +70°C
28 TSSOP
Note: Please indicate that you are using the MAX1165 when con-
tacting these component suppliers.
SUPPLIER
PHONE
FAX
WEBSITE
Taiyo
Yuden
800-348-2496 847-925-0899
w w w .t- yud en.com
DESIGNATION
QTY
DESCRIPTION
C1, C2, C11,
C12
4
10µF, 10V X7R ceramic capacitors
Taiyo Yuden LMK325BJ106MN
C3, C4, C5, C8,
C9, C10
6
0.1µF, 10V X7R ceramic capacitors
C6
1
4.7µF, 10V X7R ceramic capacitor
Taiyo Yuden JMK212BJ475KG
C7
1
0.01µF ceramic capacitor
C7, R2
4
Socket-pin receptacles
H1
1
2
× 16 dual-row vertical header
JU1JU6
6
2-pin headers
R1
1
100k
±5% resistor
R2
1
4.7
±5% resistor
U1
1
MAX1165BEUI
U2
1
Hex Schmitt trigger buffer 74HC14
U3
1
MAX4430ESA
None
1
MAX1165 EV kit PC board
None
1
MAX1165 data sheet
None
1
MAX1165 EV kit data sheet
Component Supplier

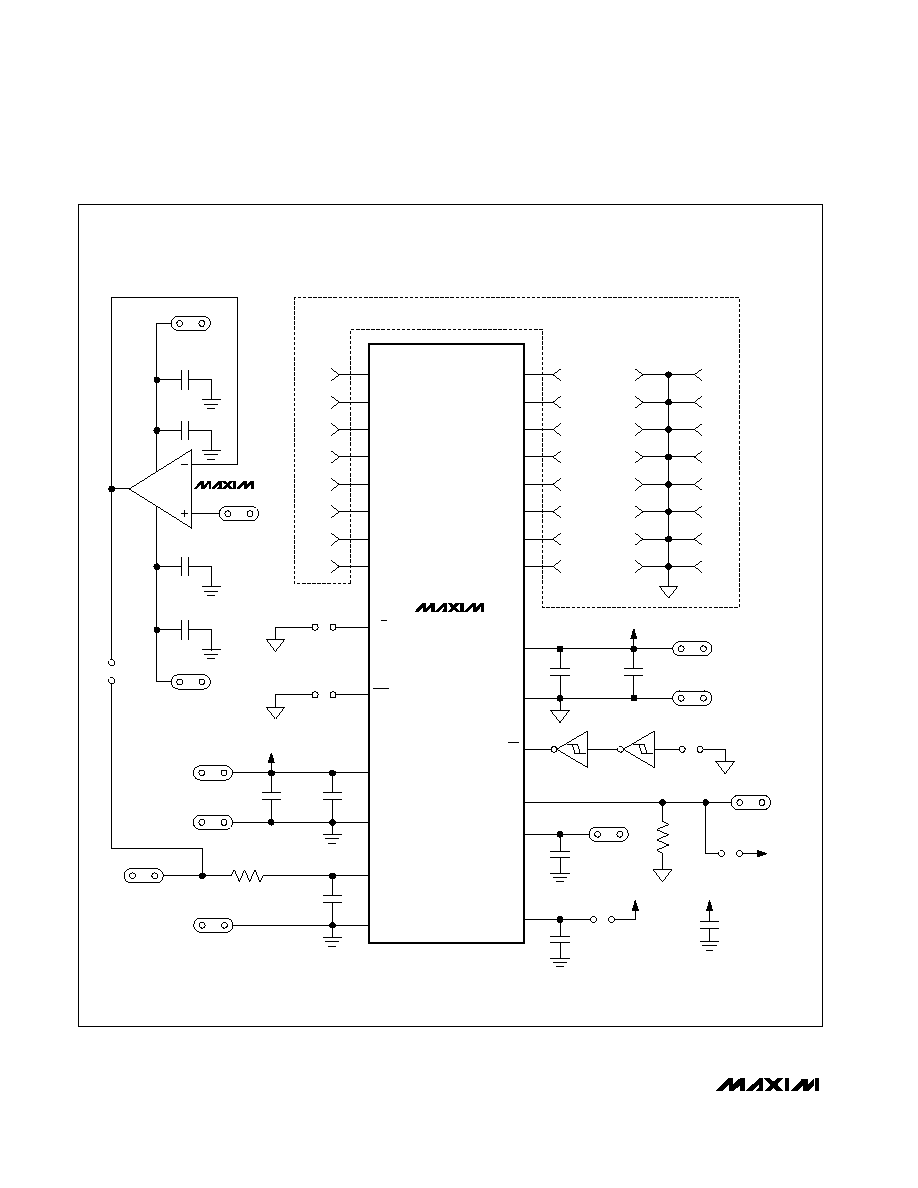
Detailed Description of
Hardware
The MAX1165 (U1) is a single-channel, 16-bit data-
acquisition system. Anti-alias filtering is performed by
R2 and C7. The input signal can be applied directly to
the AIN pad, or an optional MAX4430 precision buffer
(U3) can be used instead. Capacitors C4 and C6
bypass the reference. Schmitt trigger (U2) ensures
proper system timing by keeping the CS rising and
falling edges clean.
Analog Input Buffer
When powered from ±5V supplies, the analog input
buffer (U3) has an input common-mode range of -2.5V
to +4.1V.
1) With the power off, connect the +5VDC power sup-
ply between BUF+5 and AGND.
2) With the power off, connect the -5VDC power sup-
ply between BUF-5 and AGND.
3) With the power off, connect the DC power supply
ground return to AGND.
4) Install a shunt across jumper JU3.
5) Apply analog input signal to BUFIN pad.
If the full unipolar 0 to 5V range is needed, apply +7V to
BUF+5 and -3V to BUF-5. The input common-mode
range is -0.5V to +6.1V.
Generating a Crossplot
To see a visual indication of relative LSB size and DNL
performance, create a crossplot fixture using a function
generator, a latch, a resistor network, and an oscillo-
scope. Latch the data on the falling edge of EOC.
Connect the least significant bits together, using resis-
tors of varying weights (for example, D0 = 75.0k
±1%,
D1 = 39.1k
±1%, D2 = 20.0k ±1%, D3 = 10.0k
±1%, D4 = 4.99k
±1%). Drive the analog inputs with a
linear ramping signal, such as a 100Hz triangle wave.
Connect an oscilloscope in X-Y mode with X = analog
input and Y = weighted sum of the latched digital out-
puts. The resulting staircase plot gives a visual indica-
tion of relative LSB sizes and DNL performance.
Evaluating the MAX1165/MAX1166 and
MAX1065/MAX1066
The MAX1166 has an 8-bit interface. Its high-byte
enable (HBEN) is on the pad labeled RESET. To evalu-
ate the MAX1166, request a free sample of the
MAX1166BEUP. Remove the MAX1165 and install the
MAX1166, leaving U1 pins 14 and 2528 unconnected.
The MAX1065 is a 14-bit version of the MAX1165. To
evaluate the MAX1065, request a free sample of the
MAX1065AEUI. Remove the MAX1165 and install the
MAX1065.
The MAX1066 is a 14-bit version of the MAX1165, with
an 8-bit interface. Its high-byte enable (HBEN) is on the
pad labeled RESET. To evaluate the MAX1066, request
a free sample of the MAX1066AEUP. Remove the
MAX1165 and install the MAX1066, leaving U1 pins 14
and 2528 unconnected.
See Table 2 for device comparison.
Troubleshooting
Problem: no output measurement. System seems to
report zero voltage, or fails to make a measurement.
Check AVDD and DVDD supply voltages. Check the
4.096V reference voltage using a digital voltmeter. Use
an oscilloscope to verify the R/C, CS, and EOC signals.
Ensure that a resistor is installed in socket R2; other-
wise, the analog input is unconnected.
If using the input buffer U3, ensure that the ±5V power
supply is connected and JU3 is closed.
Problem: measurements are erratic, unstable; poor
accuracy.
Check the reference voltage using a digital voltmeter.
Use an oscilloscope to check for noise. When probing
for noise, keep the oscilloscope ground return lead as
short as possible, preferably less than 1/2in (10mm).
Increase C6 and C7 capacitance. Short JU1 and apply
an external 4.096V reference at REF to improve accuracy.
Check for ground loops in your system.
Evaluates: MAX1165/MAX1166/MAX1065/MAX1066
MAX1165 Evaluation Kit
2
_______________________________________________________________________________________
Evaluates: MAX1165/MAX1166/MAX1065/MAX1066
MAX1165 Evaluation Kit
_______________________________________________________________________________________
3
Table 1. Jumper Functions
JUMPER
FUNCTION
JU1
Leave JU1 open to enable the internal reference. Short JU1 when applying an external reference at REF.
JU2
Momentarily short JU2 to reset U1 (MAX1165/MAX1065 only). Leave JU2 open and apply high-byte enable signal
(HBEN) at the RESET pad (MAX1166/MAX1066 only).
JU3
Short JU3 to drive analog input from MAX4430 buffer U3. Leave JU3 open when driving AIN directly through R2.
JU4
Apply conversion start signal (CS) across JU4
JU5
Apply read/convert signal (R/C) across JU5
JU6
Obtain end-of-conversion (EOC) signal from JU6
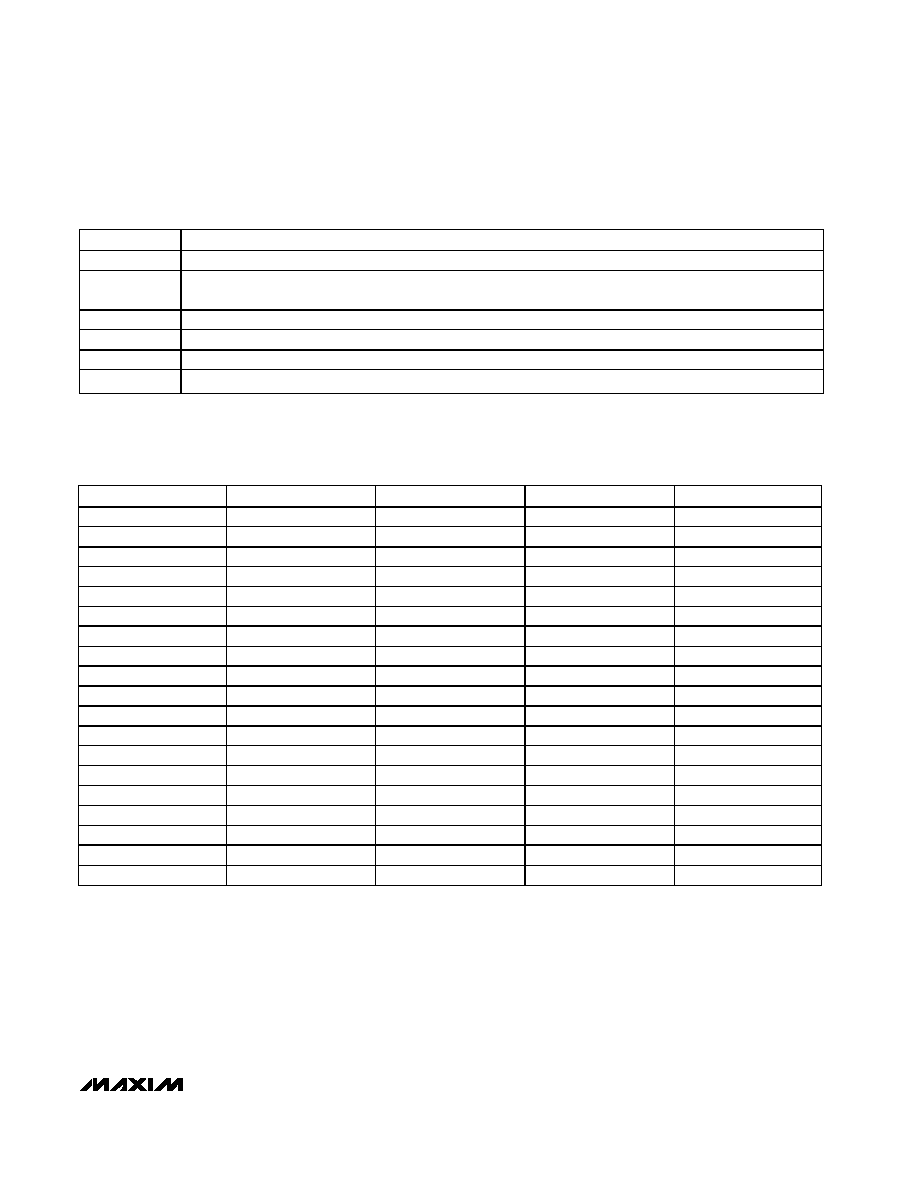
Table 2. Device Comparison
PART
MAX1165
MAX1166
MAX1065
MAX1066
RESOLUTION
16 bit
16 bit
14 bit
14 bit
INTERFACE WIDTH
16 bit
8 bit
16 bit
8 bit
H1-1 signal
D0
D0/D8
Not used
D0/D8
H1-3 signal
D1
D1/D9
Not used
D1/D9
H1-5 signal
D2
D2/D10
D0
D2/D10
H1-7 signal
D3
D3/D11
D1
D3/D11
H1-9 signal
D4
Not used
D2
Not used
H1-11 signal
D5
Not used
D3
Not used
H1-13 signal
D6
Not used
D4
Not used
H1-15 signal
D7
Not used
D5
Not used
H1-17 signal
D8
Not used
D6
Not used
H1-19 signal
D9
Not used
D7
Not used
H1-21 signal
D10
Not used
D8
Not used
H1-23 signal
D11
Not used
D9
Not used
H1-25 signal
D12
D4/D12
D10
D4/D12
H1-27 signal
D13
D5/D13
D11
D5/D13
H1-29 signal
D14
D6/D14
D12
D6/0
H1-31 signal
D15
D7/D15
D13
D7/0
RESET pad
RESET
HBEN
RESET
HBEN
Evaluates: MAX1165/MAX1166/MAX1065/MAX1066
MAX1165 Evaluation Kit
4
_______________________________________________________________________________________
H1-17
1
H1-19
2
H1-21
3
H1-23
4
H1-25
5
H1-27
6
H1-29
7
H1-31
8
H1-15
28
H1-13
27
H1-11
26
H1-9
25
H1-7
24
H1-5
23
H1-3
22
H1-1
21
H1-16
H1-14
H1-12
H1-10
H1-8
H1-6
H1-4
H1-2
H1-18
H1-20
H1-22
H1-24
H1-26
H1-28
H1-30
H1-32
MAX1165
U1
HEADER 32-PIN
18
2
1
4
3
JU4
U2-A
74HC14
U2-B
74HC14
17
R1
100k
JU2
RESET
16
REF
C6
4.7
µF
DVDD
C5
0.1
µF
C2
10
µF
10V
DVDD
DVDD
DGND
20
19
C10
0.1
µF
DVDD
JU1
AVDD
C4
0.1
µF
15
C3
0.1
µF
C1
10
µF
10V
AVDD
AVDD
AGND
11
12
C7
0.01
µF
AIN
AGND
13
14
R2
4.7
JU5
JU6
JU3
9
10
BUF +5
C11
10
µF
10V
C9
0.1
µF
U3
MAX4430
6
7
4
2
3
BUF-5
C8
0.1
µF
C12
10
µF
10V
D8
D9
D10
D11
D12
D13
D14
D15 (MSB)
AVDD
AGND
AIN
AGND
R/C
EOC
D7
D6
D5
D4
D3
D2
D1
D0
CS
RESET
REF
DVDD
DGND
REFCAP
BUFIN
Figure 1. MAX1165 EV Kit Schematic
Evaluates: MAX1165/MAX1166/MAX1065/MAX1066
MAX1165 Evaluation Kit
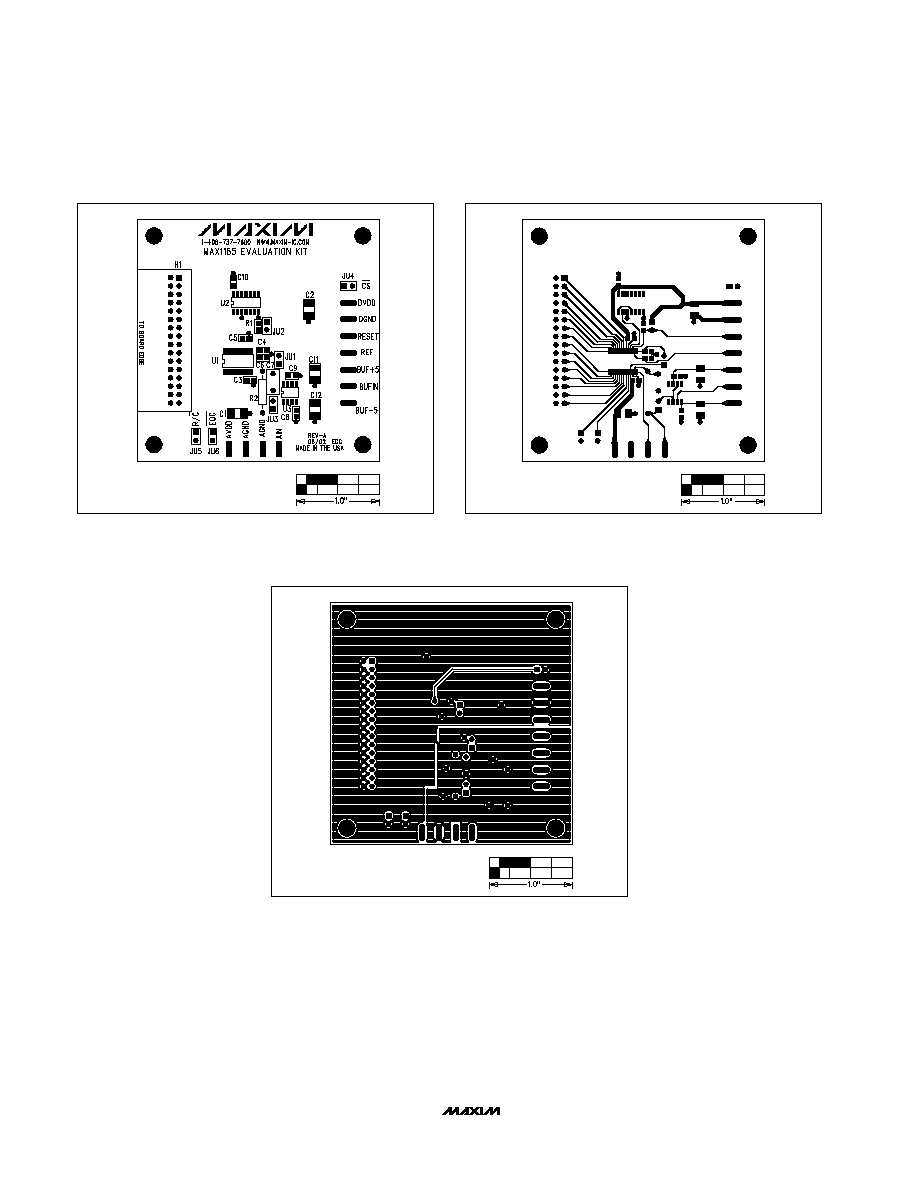
Figure 2. MAX1165 EV Kit Component Placement Guide--
Component Side
Figure 3. MAX1165 EV Kit PC Board Layout--Component Side
Figure 4. MAX1165 EV Kit PC Board Layout--Solder Side
Maxim cannot assume responsibility for use of any circuitry other than circuitry entirely embodied in a Maxim product. No circuit patent licenses are
implied. Maxim reserves the right to change the circuitry and specifications without notice at any time.
Maxim Integrated Products, 120 San Gabriel Drive, Sunnyvale, CA 94086 408-737-7600 _____________________ 5
© 2002 Maxim Integrated Products
Printed USA
is a registered trademark of Maxim Integrated Products.