
1 of 11
REV: 030603
GENERAL DESCRIPTION
The DSTINIm400 is a fully assembled and tested
circuit board that evaluates the DS80C400 network
microcontroller. In addition to the DS80C400, the
DSTINIm400 includes a real-time clock, 1MB flash,
1MB static RAM, and support for an external
Ethernet PHY for connecting to a wide variety of
networks. The circuit board is designed as a module
to be plugged into a 144-pin SODIMM connector. For
evaluation, the DSTINIm400 can be inserted into the
DSTINIs400 socket board. The combination of the
two boards allows full evaluation of the features of
the DS80C400 using an Ethernet network.
TINI and 1-Wire are registered trademarks of Dallas
Semiconductor.
FEATURES
§
Hosts the TINI
®
Runtime Environment in
Validated Hardware Design
§
Industry Standard MII Interface to Connect to a
Wide Variety of Network Interfaces Including
10/100 Base-T, Optical, and HomePNA
§
Three Hardware Serial Ports
§
Integrated 1-Wire
®
Network Master
§
CAN2.0B Port
§
Real-Time Clock for Time Stamping
§
1MB Flash ROM for Application Storage
§
1MB NV SRAM for Data Storage
§
3.3V Single-Supply Operation
§
Fully Assembled and Tested Design
ORDERING INFORMATION
PART
TEMP RANGE
IC PACKAGE
DSTINIm400-144
0°C to +70°C
144 SODIMM
Note: To evaluate the DS80C400, order both a DSTINIm400 and
a DSTINIs400.
COMPONENT LIST
DESIGNATION QTY
DESCRIPTION
U1 1
DS80C400 Network
Microcontroller
U2, U3
2
HM62W8512BLTT-7UL
512kB RAM
U4 1
AM29LV081B-70EC 1MB
flash
U5, U6
2
MAX6365PKA31 reset
controllers
U7
1
MAX1792EQU18 voltage reg
U8
1
DS1672U-33 real-time clock
U9 1
DS2502-E48 IEEE MAC
address
Y1 1
14.7456MHz
crystal
Y2 1
32kHz
crystal
BT1
1
CR1632 3V lithium cell
C1, C2, C3, C4,
C5, C8, C9,
C10, C11, C12,
C13, C14, C17,
C18
14
0.1µF, ±20%, 10V ceramic
capacitor (0805)
DESIGNATION QTY
DESCRIPTION
C6, C7
2
27pF, ±20%, 50V C0G
ceramic capacitor (0805)
C15 1
1.0µF, ±20%, 10V ceramic
capacitor (1206)
C16 1
4.7µF, ±20%, 10V ceramic
capacitor (1206)
C19, C20
2
47µF, ±20%, tantalum
capacitor (C)
DN1
1
BAT54S diode (SOT23)
DS1
1
SML-LX23SRC Lumex LED
Q1, Q3
2
BSS84 P-Channel FET
(SOT23)
Q2 1
2N7002 N-Channel FET
(SOT23)
R1, R4, R7, R8
4
10k, ±5% resistor (0805)
R2 1
1.5k, ±5% resistor (0805)
R3 1
1k, ±5% resistor (0805)
R5 1
2.2k, ±5% resistor (0805)
R6 1
10, ±5% resistor (0805)
DS80C400 (DSTINIm400)
Networked Microcontroller
Evaluation Kit
www.maxim-ic.com

DSTINIm400EV KIT
2 of 8
QUICK START
Recommended Equipment
The minimum hardware and software requirements are:
· TINI Hardware Requirements
TINIm400 Verification Module or equivalent
TINIs400 Sockets Board or equivalent
· TINI Software Requirements
TINI Software Development Kit
Version 1.1 or later
JDK (JavaTM Development Kit)
from Sun Microsystems or equivalent
1
Java Communications API
from Sun Microsystems or
www.rxtx.org
· Development System Requirements
Operating system meeting requirements of the JDK from Sun Microsystems
1 RS-232 (COM) port--115200 baud recommended
RS-232C serial cable DB9 male to DB9 female
: Radio Shack Catalog Number 26-117 or equivalent
Crossover Ethernet cable
: For direct connection to a host computer, use a crossover Ethernet cable such as
the Radio Shack Catalog Number 950-0368 or equivalent. To connect to a router or hub, use a straight-
through Ethernet cable.
5V DC power supply
capable of supplying 150mA: Radio Shack Catalog Number 900-2740 or equivalent
(center positive)
Procedure
1) Prior to beginning, verify power is not connected to the TINIs400 sockets board.
2) Insert the TINIm400 Verification Module into the 144-pin connector on the TINIs400 sockets board.
3) Verify the jumper labeled as DTR Reset (J14) is placed on the sockets board.
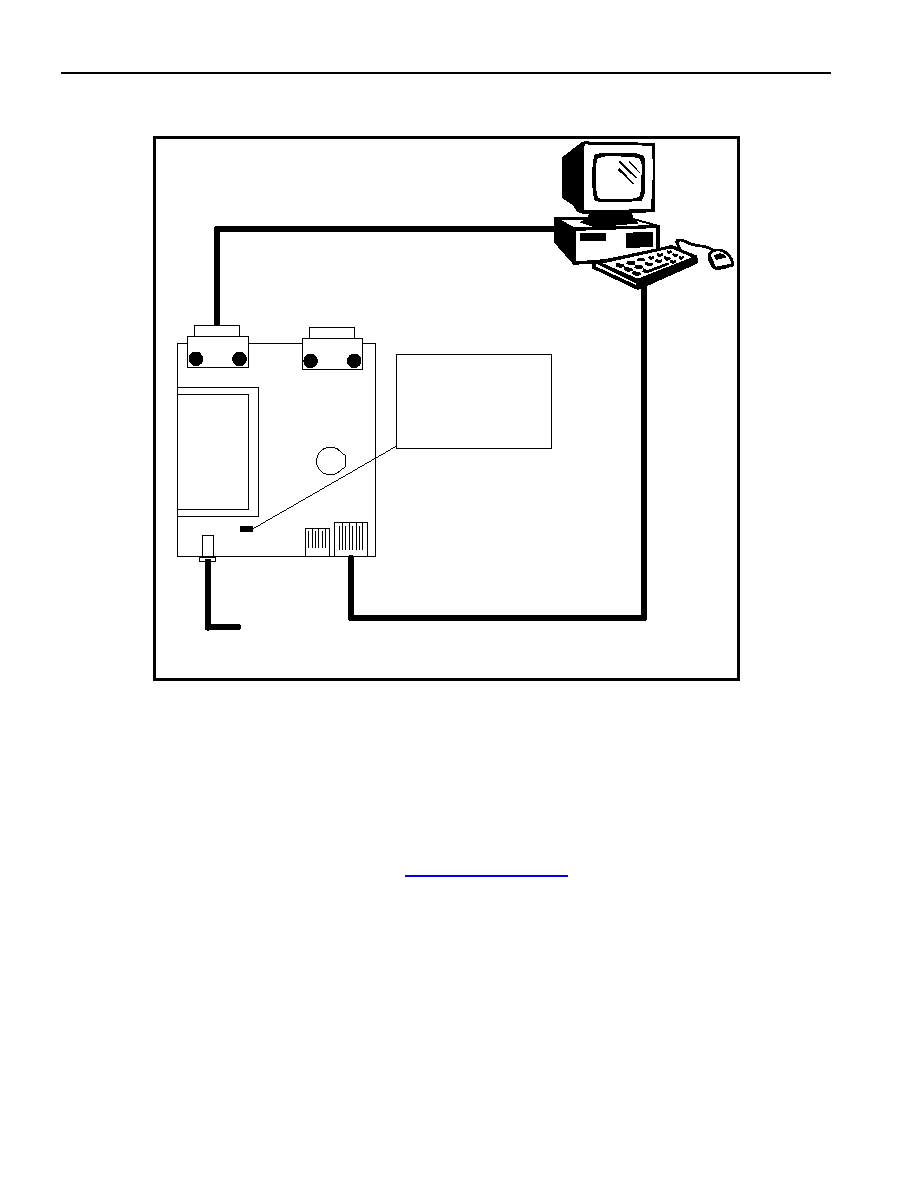
4) Attach an RS-232 serial cable to the connector labeled "LoaderSerial 0" on the TINIm400 sockets board as
shown in
Figure 1
.
5) Connect the serial cable to a serial port on your PC.
6) Next, attach the crossover Ethernet cable between the PC and the TINIs400 sockets board.
7) Note: If the TINI sockets board is not being connected directly to a network interface card, but instead to a
separate network port on a hub or switch, a straight through Ethernet patch cable should be used.
8) Connect the power adapter to your TINIs400 sockets board as shown in
Figure 1
. A center positive 5V DC
regulated power supply must be used with the TINIs400 sockets board. Other sockets boards may have
different power requirements. Refer to the sockets board documentation for more information.
9) Plug the power adapter into a wall socket.
1
The TINI Software Development Kit has been extensively tested with JDK1.3 from Sun Microsystems. Later versions of the JDK should work in
the same manner. Check the documentation for your version of the JDK to verify the installation procedure.
Java is a trademark of Sun Microsystems.
DS80C400 (DSTINIm400) Networked Microcontroller EV KIT
3 of 11
Figure 1. Typical Hardware Setup
TINIs400 Sockets
Board
To Computer RS232 Port
Loader - Serial 0
J12
To PC Ethernet Port through crossover cable or
to a hub using a straight-through cable
5VDC, Center Positive, 300mA
Regulated Power Source
T
I
NI
m
400
V
e
rif
i
cat
i
on M
o
d
u
le
DTR Reset Enable
jumper (J14) must be
placed to load firmware
width & height of box.
SOFTWARE SETUP
First, download and install the Java Development Kit and Java Communications API from Sun Microsystems.
Installation instructions and example applications are included in both packages. You should verify correct
installation by running the
BlackBox
example provided with the Java Communications API.
Loading the TINI Runtime Environment
Download the TINI Software Development Kit from
www.maxim-ic.com/TINI
. The download file should be unzipped
to a location of your choice on your hard drive (<TINI SDK Install Dir>).
To begin using the TINIm400 Verification Module, the TINI runtime environment must first be loaded into the flash
of the verification module. Loading the runtime environment requires executing a program called JavaKit.
Application binaries are loaded through the serial port of the TINI verification module.

DS80C400 (DSTINIm400) Networked Microcontroller EV KIT
4 of 11
Running JavaKit
1)
To run JavaKit, open a command shell or DOS prompt on your PC. Change to the <TINI SDK Install Dir>\bin
directory.
2)
Next, type java classpath tini.jar JavaKit 400 flash 40 at the command prompt and press
Enter to run the JavaKit application. If you have the Java Development Kit and the Java Communications API
properly installed, JavaKit should appear on the screen.
3)
Select the port name where the TINI Verification Module is attached. Press the Open Port button. The default
baud rate of 115200 should be used on all platforms where it is supported.
4)
After opening the port, press the Reset button. The loader prompt should be displayed on the JavaKit screen
(
Figure 2
).
5)
If the message is not displayed, verify the cable connections and check that the correct port name is selected.
If everything appears to be attached correctly, read the Running_JavaKit.txt file contained in the TINI SDK for
more detailed information.
6)
At the JavaKit prompt, type B0 and press Enter, followed by F0 and Enter. This clears the RAM of the TINI
Verification Module. Any time a new runtime environment is loaded the memory should be cleared.
7)
Now click on the File menu in JavaKit and select
Load File
.
A file dialog appears on the screen. Browse to
the <TINI SDK Install Dir>\bin directory and select the
tini_400.tbin
file and click the Open button. Load
Complete is displayed on the screen when the firmware is loaded, this can take up to 30 seconds.
8)
To load the command shell, click on the File
menu and select
Load File
again. Select the
slush_400.tbin
file and click on the Open button. When Load Complete appears, slush has been
successfully loaded into the flash of the TINIm400 Verification Module.
9)
Press the reset button and the JavaKit loader prompt shown in
Figure 2
is displayed.
10)
At the JavaKit prompt, type E and hit Enter. Slush begins booting and text similar to that shown in
Figure 3
prints on the JavaKit screen.
11)
Press Enter and a slush login prompt is displayed. Type in the username root and press
Enter. The initial
password is
tini
.
12)
You should now be logged into slush. To view a list of valid shell commands, type help at the command
prompt. Detailed information on specific commands, such as dir, can be obtained by typing help,
followed by
the command.

DS80C400 (DSTINIm400) Networked Microcontroller EV KIT
5 of 11
Figure 2. JavaKit Loader Prompt